A graphics card (GPU) is one of the most important components in any gaming or content creation setup. If you’re upgrading your system or building a PC for the first time, learning how to install a graphics card in a PC is essential for unlocking powerful visuals and performance.
This guide provides a complete, formal, step-by-step breakdown to help you install a graphics card safely and correctly, even if you’re a beginner.
Table of Contents
ToggleHow to Install a Graphics Card in a PC step by step:-
🔹 Step 1: Choose the Right Graphics Card
Before you begin installation, ensure that your graphics card is compatible with your system.
✅ Key Factors to Consider:
- Motherboard slot: Your motherboard must have a PCIe x16 slot
- Power supply (PSU): Check wattage and available 6-pin or 8-pin PCIe connectors
- PC case size: Ensure enough physical space for the GPU
- Monitor connection: Match the HDMI, DisplayPort, or DVI outputs to your monitor
📝 Always consult the specifications of your GPU, PSU, and motherboard.
🔹 Step 2: Gather Tools and Prepare Workspace
✅ Required Tools:
- Phillips-head screwdriver
- Anti-static wrist strap (recommended)
- Flat surface with good lighting
✅ Safety Tips:
- Shut down your PC completely
- Unplug the power cable from the wall
- Press the power button for 5 seconds to discharge residual energy
🔹 Step 3: Open Your PC Case\

Remove the side panel of your PC to access the motherboard.
✅ Instructions:
- Unscrew the side panel screws (usually at the rear of the case)
- Carefully slide or lift off the panel
- Place screws in a safe place
🔧 Remove only the side panel that gives access to the motherboard and PCIe slots.
🔹 Step 4: Locate the PCIe Slot and Remove Expansion Slot Covers
The PCIe x16 slot is the longest slot on your motherboard and is usually located near the center.
✅ What to Do:
- Identify the top PCIe x16 slot (preferably closest to the CPU)
- Remove metal brackets or slot covers from the back of the case that align with the slot
- These brackets allow your GPU’s output ports to be accessible from the back
🔹 Step 5: Insert the Graphics Card into the PCIe Slot
✅ Installation Steps:
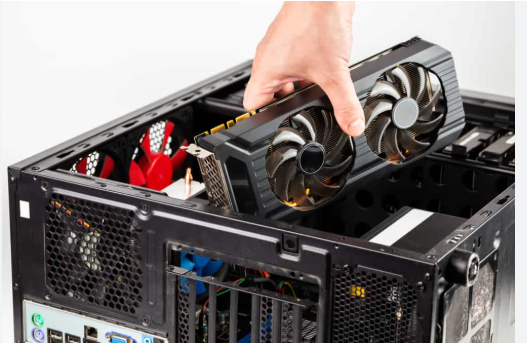
- Hold the graphics card by its edges
- Align the gold PCIe connector on the card with the PCIe x16 slot
- Firmly push the card straight into the slot until it clicks into place
- Ensure that the rear bracket of the GPU fits into the case’s I/O opening
⚠️ Do not use excessive force. If the card doesn’t fit, double-check the alignment.
🔹 Step 6: Secure the Graphics Card
Use the screws you removed earlier to fasten the graphics card to the rear expansion slot bracket.
✅ Why This Is Important:
- Prevents the GPU from sagging or moving
- Ensures electrical contacts stay seated properly
🔹 Step 7: Connect Power Cables (If Required)
Most modern graphics cards require external power from the PSU.
✅ Power Connection Types:
- 6-pin connector
- 8-pin connector
- Some high-end cards use 2×8-pin or more
✅ Steps:
- Locate the appropriate PCIe power cables from your power supply
- Plug them firmly into the GPU’s power sockets
- Ensure all connections are tight
📝 Modular PSUs may require you to connect the PCIe cables at the PSU end too.
🔹 Step 8: Reassemble the Case and Connect Monitor
- Replace the side panel and secure it with screws
- Plug your monitor cable (HDMI, DisplayPort, etc.) into the new graphics card—not the motherboard port
- Reconnect the power cable to the PC
- Power on the system
🔹 Step 9: Install Graphics Drivers
Once your PC boots into Windows (or your operating system), you’ll need to install or update GPU drivers.
✅ For NVIDIA Cards:
- Visit www.nvidia.com/Download/index.aspx
- Download the latest GeForce Game Ready Driver
✅ For AMD Cards:
- Visit www.amd.com/en/support
- Download the latest Radeon Software
✅ Installation:
- Run the installer
- Choose “Express Install”
- Restart your PC when prompted\
Read also:-Why Is My Phone Charging Slowly? Step-by-Step Guide to Fix Slow Charging Issuesc
🔹 Step 10: Test the Installation
Once the drivers are installed:
- Open Device Manager > Display adapters to confirm detection
- Launch a game or benchmark tool (e.g., 3DMark, Unigine Heaven) to test performance
- Check temperatures with tools like MSI Afterburner or HWMonitor
✅ Conclusion
Learning how to install a graphics card in a PC is a rewarding skill that unlocks the full potential of your system. Whether you’re gaming, editing videos, or rendering 3D models, upgrading your GPU can dramatically enhance performance.
By following this step-by-step guide—carefully handling the hardware, ensuring compatibility, and installing drivers—you’ll have your new graphics card up and running safely and efficiently.


